Project Management with Jira for WebApp Startup on K8S

Project management starts by understanding the business needs and gathering requirements from stakeholders to define the project’s initial scope. This scope is then broken down into manageable parts through a Work Breakdown Structure (WBS), which serves as the basis for detailed planning.
Depending on project complexity and organizational context, initial planning may involve a full WBS with detailed epics and stories—as in hybrid frameworks like SAFe—or start with a few high-level epics that are progressively refined throughout the project, following Agile principles. Management plans for risk, schedule, communication, and quality are tailored accordingly, combining upfront planning with continuous iterative updates to maintain both flexibility and control.
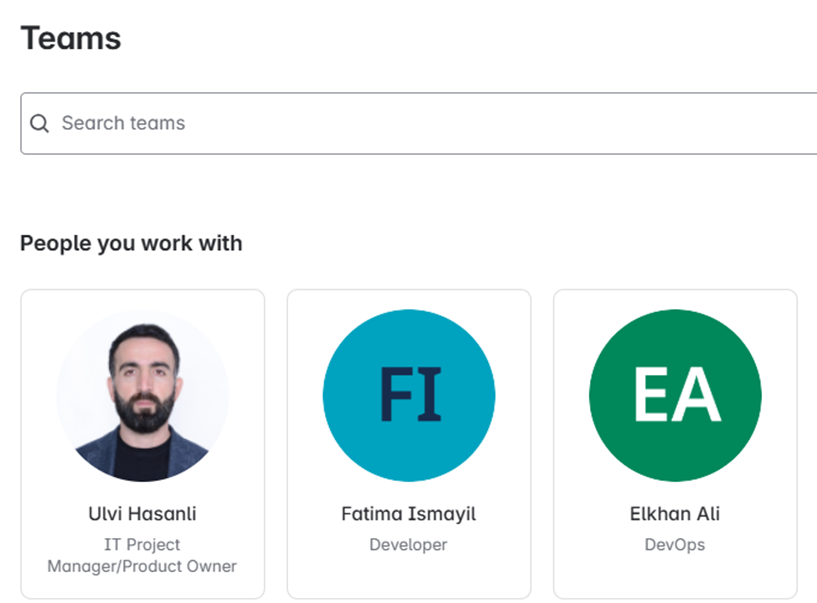
Step 1: Define Stakeholders and Set Up the Project Team in Jira
- Identify key stakeholders and their roles in the project.
- Define the core delivery team (e.g., Product Owner, Scrum Master, Developers, QA).
- Add all team members to the Jira project with appropriate roles and permissions.
*Names are redacted.
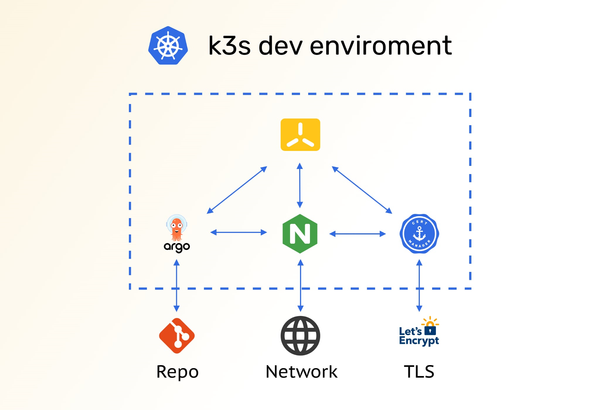
Step 2: Set Up Confluence Mind Map (optional for better visibility)
- Visualize epics, timelines, roles, deliverables, risks, quality checkpoints, and release plans.
- Maintain as a living document for transparency.
Note: This is a draft version and may be updated as processes evolve.
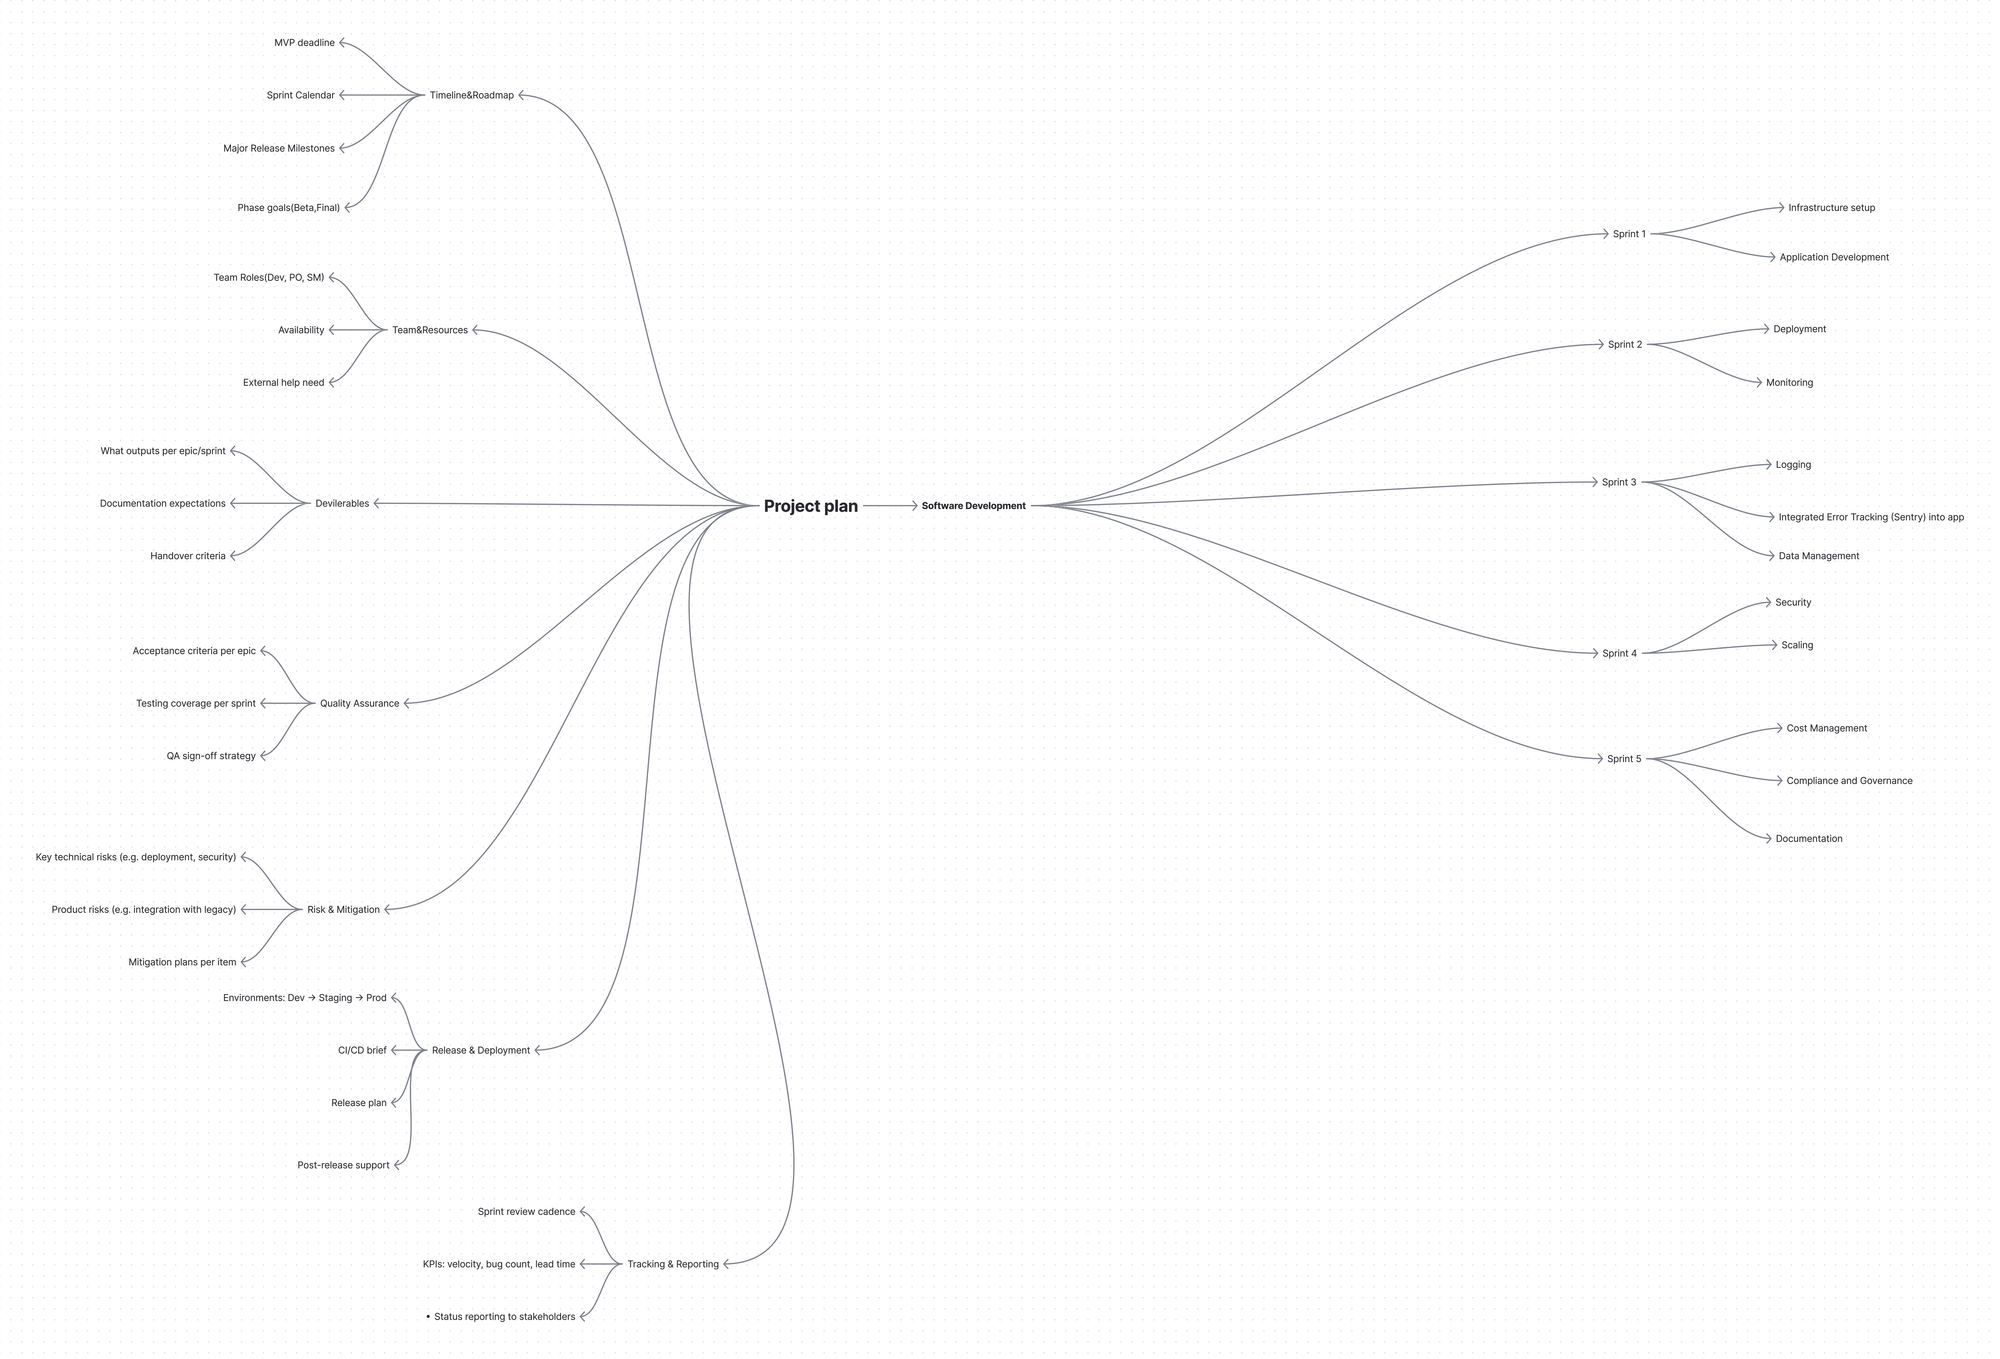
(Optional Step) Planning Support: Lightweight WBS
- Before creating epics, a simple Work Breakdown Structure (WBS) may be created to help identify major deliverables.
Note: While WBS creation is typically outside of Jira, it helps bridge traditional planning with Agile execution.
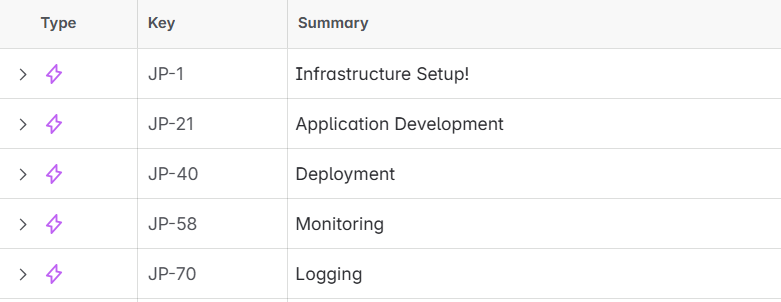
Step 3: Define Epics in Jira
- Translate WBS and requirements into Epics in Jira, representing major deliverables (e.g., infrastructure, development, deployment).
- Assign start and finish dates aligned with project milestones.
Note: Initial dates are set here; broader schedule and dependencies are visualized in Step 5 (Roadmap).
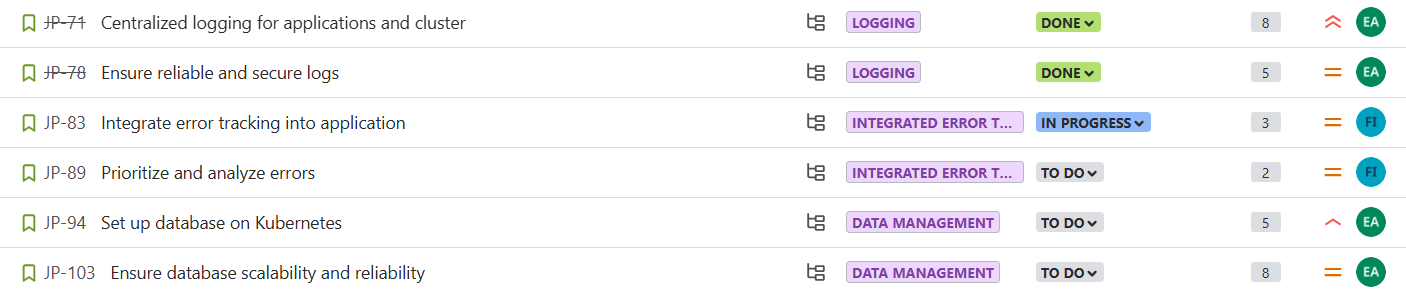
Step 4: Break Down Epics into User Stories
- Collaborate with the Scrum Team to decompose epics into user stories during backlog refinement.
- Estimate story points using techniques such as Planning Poker or T-shirt sizing
- Link stories to parent epics.
- Create subtasks if more granularity is needed.
- Add descriptions and acceptance criteria for each story.
- Assign initial owners to user stories
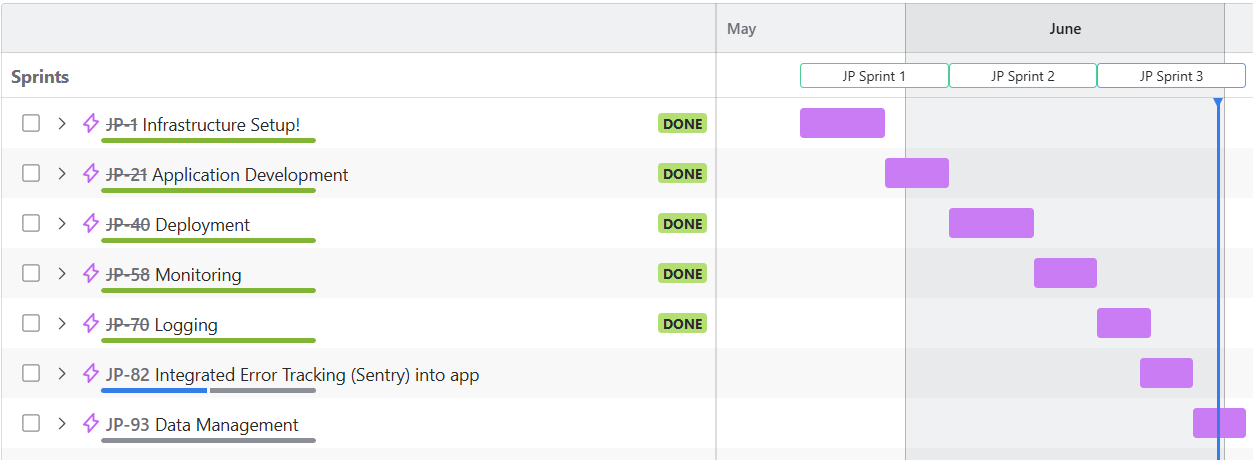
Step 5: Map Epics and Dependencies on Jira Roadmap
- Visualize epics on Jira Roadmap with start/end dates and dependencies.
- Track schedule alignment, identify bottlenecks, and update regularly.
Step 6: Prioritize and Groom Backlog
- The Product Owner prioritizes backlog items based on business value and risk.
- Conduct regular grooming sessions with the Scrum team.
- Update priority fields in Jira (e.g., High, Medium, Low or custom ranking systems).
- Ensure backlog is clear, current, and properly estimated before Sprint Planning.
Step 7: Sprint Planning
- Select stories for the sprint based on team capacity and sprint goals.
- Move selected stories into the sprint backlog.
- Reconfirm the Definition of Done (DoD) to ensure team-wide understanding of completion criteria.
- Update/add owners to user stories, if there is missing during step 4.

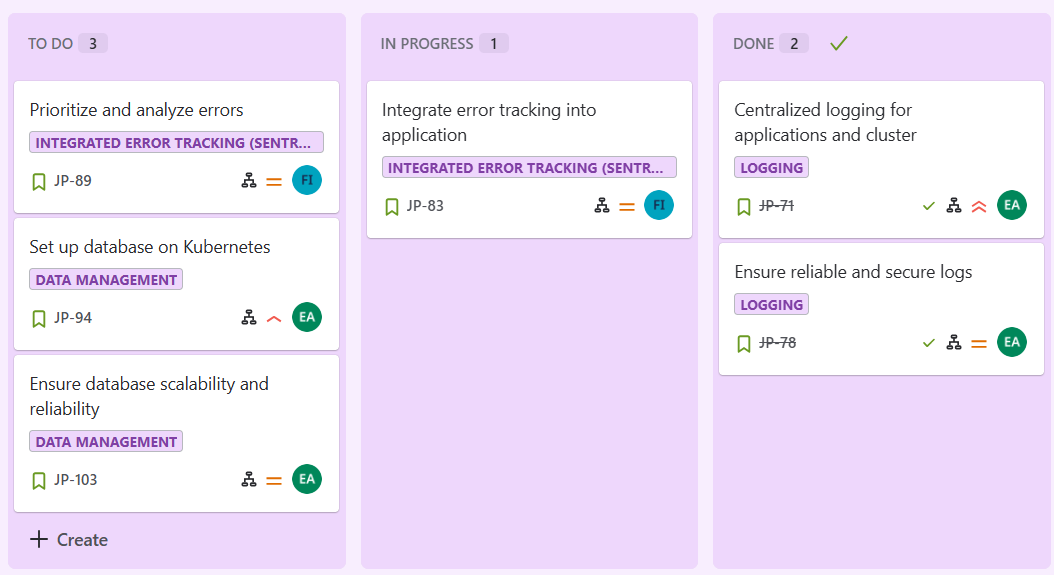
Step 8: Execute Sprint Using Jira Board
- Use Jira board columns like To Do, In Progress, and Done to track work.
- Hold daily standups to discuss progress, blockers, and next steps.
- Log blockers and update statuses.
- Conduct Sprint Retrospective at the end to capture lessons and improvement areas.
Step 9: Manage Quality Assurance
- Link test cases and defects to user stories.
- Track testing status, bug resolution, and test coverage throughout the sprint
Step 10: Identify and Mitigate Risks
- Log risks as Jira issues or Confluence entries.
- Assign owners and mitigation actions.
- Continuously update the risk register.
Note: Risk management begins before initiation and continues through closure.
Step 11: Plan and Track Releases
- Define release milestones and associated deployment tasks.
- Use release checklists, QA sign-off, rollback plans, and attach relevant release notes.
Step 12: Monitor Project Progress
- Use Jira dashboards and reports to track sprints, epics, and project KPIs.
- Monitor metrics like velocity, burndown, lead time, and escaped defects.
- Communicate progress and risks to stakeholders proactively.
Step 13: Maintain Documentation
- Keep critical documentation up to date in Confluence to ensure transparency, traceability, and alignment.
This includes:- Mindmap (Step 2) — high-level visual planning
- Definition of Done (DoD) (Step 7) — shared completion criteria
- Risk Register (Step 10) — active risk tracking
- Change log - for scope, requirement, or timeline adjustments.
- Retrospective Notes (Step 8) — continuous improvement
- Meeting Notes and Decisions — record of team communication
Link relevant Jira issues to Confluence pages and vice versa. Good documentation is a living asset and essential for onboarding, governance, and project audits
Step 14: Project Closure
- Conduct a final project retrospective and document lessons learned.
- Archive Jira and Confluence content for future reference.
- Release team resources, close out open issues, and ensure all documentation is finalized